
How to Install a Camlock Coupling (and 6 Mistakes That Cause Leaks)
Camlock couplings are the fastest quick-connect fittings to install — and the easiest to install wrong. A correctly installed camlock takes three seconds to connect and lasts for years. One of the six classic mistakes, and you are back at the hose cart before the shift ends, with a puddle, a blow-off, or a seized coupling to explain. The coupling itself is rarely at fault: most field failures trace back to what happened during installation. This guide covers the complete procedure — tools, pre-install checks, the eight-step hose installation, threaded ends, the mistakes that cause leaks, disassembly and maintenance, selection logic, and safety — so the next coupling you fit stays dry on the first try.
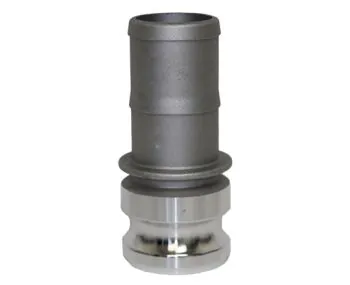
Step 1: insert the male adapter fully into the coupler before closing arms.
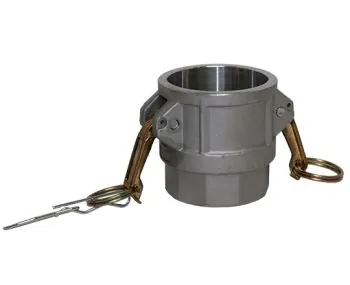
Both cam arms closed hand-tight — the sealed state.
What You Need: Tools and Materials
The cam end of a camlock needs no tools at all — that is the entire point of the design. Everything you need for a hose-shank installation fits in one hand:
- Calipers (digital or dial) for measuring hose inside diameter. For sizes above 4” a tape measure works, but calipers are the reliable tool for the 1/2” to 2” range where most size errors happen.
- Tape measure for longer hose runs and for confirming pipe sizes.
- A hose clamp matched to the hose, in one of three families: a worm-drive (screw) clamp for general low- and medium-pressure duty, a T-bolt or bolt clamp for larger diameters and higher pressures, or a crimp band if your operation uses a ferrule crimping tool. For layflat hose, use a wide-band clamp — a narrow worm-drive band can cut into the fabric reinforcement under pressure.
- A flathead or socket driver (or a small wrench for bolt clamps) to tighten the clamp.
- An adjustable wrench for threaded ends, plus a backup wrench for the pipe side.
- PTFE thread sealant tape or thread sealant paste for threaded adapters — one or the other, never both.
- A sharp utility knife with a new blade for a clean, square hose cut.
- A marker for marking seating depth if you want to verify the hose is fully home.
- Soapy water in a spray bottle for the final leak check — the classic bubble test.
- Spare gaskets in the correct compound for your media. Gaskets are consumables, not lifetime parts.
- Safety glasses and gloves — especially when working on lines that have carried chemicals or fuel.
That is the complete list. There is no special installation tooling, no torque wrench, and nothing that requires the coupling manufacturer’s own equipment. The two places tools actually appear are the hose clamp and the threaded end, and both are covered step by step below.
Pre-Installation Checklist
Run through this checklist before you fit anything. It takes thirty seconds and eliminates most of the leaks that get blamed on installation:
- Same nominal size on both halves. The size is stamped or cast on the body of most camlocks. A 2” coupler and a 2” adapter mate; a 2” coupler and a 1-1/2” adapter do not — and forcing a near-size match deforms the gasket and overloads the cams.
- Correct type pairing. The male cam end (types A, E, F, DP) must meet a female cam end (types B, C, D, DC). Two male ends or two female ends simply do not assemble. See the camlock coupling types guide if you are unsure which letter you are holding.
- Gasket present, correct compound, seated flat. The gasket lives in the machined groove in the female coupler’s face. No gasket means metal-on-metal and a guaranteed leak. EPDM for water and mild chemicals, NBR for fuel and oil, Viton (FKM) for aggressive chemicals and high temperature, PTFE for maximum inertness — see the gasket selection guide for the full compatibility table.
- Both cam arms fully open. The coupler must be ready to receive the adapter before you attempt the connection.
- Clean sealing surfaces. Wipe the adapter groove and the coupler face. A grain of sand in the gasket groove is enough to lift the gasket and produce a weep that is impossible to explain later.
- Undamaged groove and shoulders. Check the adapter’s groove for dents and the coupler’s face for scores. Dragging hose ends on the ground dents grooves, and a dented groove makes the cam lobes catch unevenly.
- Hose end cut square. A straight 90° cut gives the clamp a full seating surface. Ragged or angled cuts leak and let the shank pull out under pressure.
- Correct hose size. Measure the hose’s inside diameter, not its outside diameter. A 2” camlock fits a 2” bore hose, and the OD of a 2” hose is typically 2-1/4” or larger depending on wall thickness.
- Threads clean and burr-free on threaded connections.
- Pressure and temperature within rating for the material and size you are installing — confirm against the size chart and the pressure rating table before you commit the coupling to service.
- Dust caps and plugs removed from both halves.
If anything on this list fails, fix it before you install — never after.
Step-by-Step: Installing a Hose-Shank Camlock (Types C and E)
Types C (female coupler, hose shank) and E (male adapter, hose shank) are the two hose-end types. The procedure is identical for both. Eight steps, about five minutes for a careful first install, under a minute once you have done it a few times.
Step 1: Measure the hose inside diameter
Insert the caliper jaws into the hose bore and read the inside diameter. This is the nominal size you order — never the outside diameter. A hose marked 2” but measuring 2.05” on the ID still takes a 2” coupling; the camlock sizes follow the nominal bore, not the exact bore. If the hose is old and has swollen or collapsed, measure at the cut end you are about to use.
Step 2: Choose the correct type
Decide which end of the run gets the female coupler (C) and which gets the male adapter (E). Any male cam end mates with any female cam end of the same size, so the pair C + E is the standard hose-to-hose connection. As a rule of thumb, put the female coupler (C) on the end that gets connected and disconnected most often — it is the easier half to handle. If one end of the hose connects to a pump outlet, tank outlet or equipment port instead of another hose, you need a threaded type (A, B, D or F) on that end — see the threaded section below.
Step 3: Cut the hose square
Use a sharp knife and cut straight across at 90° to the hose axis. A single clean cut is better than two sawing passes, which leave fibers. Remove any loose strands or burrs from the cut face — loose reinforcement fibers get trapped under the clamp and cause uneven clamping. If the hose has an inner liner, make sure it is not delaminated at the cut.
Step 4: Fit the clamp over the hose first
Slide the clamp over the hose with the band open, before the hose goes onto the shank. Position the clamp housing and screw so they are reachable after assembly — on a hose run that means facing away from the wall or frame. For a worm-drive clamp, open the band just enough to slide over the hose without catching the fabric. For layflat hose, use a wide-band clamp and make sure the band is not twisted.
Step 5: Push the hose onto the barbed shank
Push the hose onto the shank until it bottoms out against the shoulder — the step where the barbed section meets the coupling body. This is the seating that carries the pull load; the clamp only holds the hose against the barbs. If the hose is stiff, wet the outside of the shank or the inside of the hose with soapy water as a lubricant — do not use oil-based lubricants that can attack the hose compound. If you want to verify seating later, mark the hose at the shoulder edge with a marker before pushing it fully home; if the mark moves after assembly, the hose backed off.
Step 6: Tighten the clamp over the barbed zone
The clamp must sit on the shank’s barbed section — not past it and not behind it. A clamp tightened over the smooth barrel seals nothing and the hose pulls off under the first surge of pressure. Position the band so it covers the middle of the barbed zone, between barbs where possible, so the band squeezes the hose into the barb profile. Tighten snug, then check that the band is straight and square to the hose axis before the final turn. There is no benefit to crushing the hose; snug plus a firm tug-test is the target. For T-bolt and bolt clamps, tighten the two sides evenly.
Step 7: Connect the cam end
Insert the male adapter into the female coupler — square on, not at an angle. Push until the adapter seats against the gasket and the groove aligns with the cam lobes. Then close both cam arms down, one after the other. Each arm should snap past center and lie flush against the coupling body. If an arm will not close fully, the halves are not seated — stop and reseat. Forcing a half-closed arm damages the cam lobe.
Step 8: Tug-test, then pressure-test
Pull firmly on both sides of the connection. A properly seated camlock will not separate under a firm pull — the cams are engaged in the groove. Then pressurize the line to working pressure and check the gasket line with soapy water. Bubbles mean a leak; no bubbles and the connection is good. Do the same bubble check on the threaded end if this is a threaded assembly.
How to Tighten a Threaded Camlock End (Types A, B, D, F)
Threaded camlocks are the other half of the system — types A and D have female NPT threads and screw onto male pipe ends; types B and F have male NPT threads and screw into female ports. The cam end installs exactly as above; it is the threaded back that needs care.
Match the thread standard first
NPT (taper) and BSPT (taper) both seal on the threads themselves — the taper creates interference as you tighten. BSPP and NPSM (parallel) do not seal on the thread; they need a gasket or O-ring at the face. Mixing taper and parallel is a leak you will fight for years, and NPT and BSPT are not interchangeable despite looking alike — the thread angles differ (60° for NPT, 55° for BSP). Confirm the thread standard before ordering, not at installation. A 2” NPT camlock and a 2” BSPT camlock are different fittings.
Apply sealant tape the right way
For tape on a male thread: hold the tape end against the thread, one or two threads back from the end, and wrap clockwise — in the same direction the thread turns when tightening — so the tightening motion does not unravel the tape. Three to five wraps is enough; more does not seal better and can cause the tape to shred into the line. Leave the first thread clean so tape does not break off inside the pipe. Stretch the tape slightly as you wrap for a snug fit, then tear it off and press the loose end down. For paste, brush an even coat onto the male threads, again skipping the first thread.
Use tape or paste — not both. Tape plus paste can lubricate the threads so much that the joint overtightens and cracks the coupling body.
Torque: hand-tight, then a maximum of one to two turns
NPT seals by thread interference, so more torque does not equal a better seal — it equals a stressed casting. Hand-tighten the adapter onto the pipe, then give it no more than one to two full turns with a wrench. Aluminum bodies crack when overtightened, and a cracked camlock body is a replacement, not a repair. Always grip the hex flats on the coupling when wrenching, never the cam arms or the coupler body — the hex is the designed torque handle. Hold a backup wrench on the pipe side so you are not twisting the pipe or the fitting behind it.
For parallel-thread (NPSM/BSPP) ends, the seal comes from the gasket or O-ring at the face. Snug the fitting until the ring compresses — hand-tight plus about a quarter turn — and check the face seal with the bubble test.
Verify the threaded end
After tightening, check both the thread joint and the cam gasket line with soapy water at working pressure. A threaded-end leak almost always means one of three things: wrong thread standard, tape wrapped the wrong way or too thin, or overtightening that deformed the threads or cracked the body.
The 6 Installation Mistakes That Cause Leaks
These six mistakes account for the overwhelming majority of camlock leaks, blow-offs and failures. Each one is easy to make and easy to avoid once you know it:
-
Types C and E reversed. Both are hose-shank ends, which is exactly why they get confused. C is the female coupler — it snaps over a male adapter. E is the male adapter — it plugs into a female coupler. They do not mate with each other. Clamp a C on one hose end and an E on the other and you have two female… two non-mating ends and a trip back to the fitting bin. The C goes on the line that gets connected and disconnected most often.
-
Measuring outside diameter instead of nominal bore. A 2” camlock fits a 2” bore hose. Measure the inside diameter with calipers. Ordering by the hose’s outside diameter produces a coupling one size too large, and a near-size mismatch deforms the gasket and concentrates load on the cam lobes.
-
Mixed materials between halves. An aluminum adapter mated to a stainless coupler in a wet, salty environment accelerates galvanic corrosion and seizes the cams — the connection that was tool-free becomes a fight. Aluminum and brass pair badly in salt service too. Keep both halves in the same material family, or specify isolation where the service demands it.
-
Cam arms not fully closed. Half-closed arms hold at low pressure and blow off under surge. Both arms must click down flush against the body. A partially latched arm also wears the cam lobe, so the damage outlasts the immediate leak.
-
Clamp over the smooth section. The hose clamp must sit on the barbed/shank zone. Over the smooth barrel it seals nothing and the hose pulls off — often at the worst possible moment, with a full line behind it.
-
Gasket missing or wrong compound. No gasket is metal-on-metal and a guaranteed leak. The wrong compound fails even with perfect metalwork: EPDM dissolves in fuel, NBR swells in solvents. Match the gasket to the media and the temperature, not to whatever was in stock.
Two more that show up constantly in the field, technically installation errors rather than the top six: wrong thread standard (NPT into BSPT looks fine and seals poorly) and angled insertion (forcing the adapter in crooked dents the groove, misaligns the gasket, and bends cam arms).
Disassembly and Maintenance
Camlocks are designed to be taken apart — that is their reason for existing. But the disassembly order matters as much as the installation order.
Safe disassembly
- Depressurize first, always. Close the isolation valve and bleed the line. Never disconnect a camlock under pressure: the hose whips, the coupling becomes a projectile, and the released line contents go everywhere. This is the number one camlock safety rule and it applies to water lines as much as chemical lines.
- Open both cam arms fully. Opening only one arm leaves the adapter cocked in the coupler.
- Pull straight out. Do not tilt or rock the adapter — tilting binds the groove against the cams. Support the hose weight so the connection is not carrying the whole run.
- Cap the open ends with dust caps (DC) and dust plugs (DP) if the connection stays open, or reconnect immediately. An open coupler collects grit, and grit in the groove is a future leak.
Gasket inspection and replacement
The gasket is the only part of a camlock that actually seals, and it is a consumable. Inspect it every time the coupling is apart:
- Replace at the first sign of cracking, flattening, hardening or swelling. A gasket that has lost its flexibility is done, even if it looks whole.
- Typical service interval is 6–12 months for regular duty; replace sooner after heavy chemical exposure, hot service, or frequent connect/disconnect cycles.
- Replace after any disassembly in a critical-fluid line if the gasket has been compressed for a long period — many operations replace gaskets on a fixed schedule regardless of appearance.
- Stock spares in every size and compound you run. A 30-cent gasket is not worth a shutdown.
To change a gasket: peel the old one out of the machined groove (a pick helps if it is perished), clean the groove — grit under the new gasket re-introduces the leak — and seat the new one flat and untwisted. A gasket change takes under a minute on an open line.
Coupling body checks
- Cam arms: must open freely and snap flush when closed. Bent or worn arms that no longer latch are a replacement item.
- Groove: check the adapter groove for dents and the coupler face for scores. A dented groove makes the cams catch unevenly and can release under load.
- Body: look for cracks, especially on aluminum castings, which fail first under over-pressure. A cracked body is never repaired in the field.
- Lubrication: a light coat of oil or grease on the cam-arm pivots keeps them free — use food-grade lubricant on food and beverage lines. Do not lubricate the gasket face.
How to Choose the Right Camlock Before You Install
Selection mistakes look exactly like installation mistakes once the line is running. Walk through these five decisions in order and the correct coupling is the only one left.
-
Measure the connection size. Calipers on the hose bore for hose ends; pipe size for threaded ends. This is the nominal size you order — 1/2” through 6” are the standard range, with larger sizes in heavy industrial ranges. A camlock sized by nominal bore mates across manufacturers because the dimensional profile follows the cam-and-groove standard (A-A-59326D / MIL-C-27487): a 2” adapter of any make fits a 2” coupler of any make.
-
Determine both connection ends. Work out what is on each side of the joint — hose, male thread, female thread, tank outlet, equipment port. Map them to types: A (male adapter, female NPT) screws onto a male-threaded pump outlet and presents a male cam; B (female coupler, male NPT) screws into a female equipment port; C (female coupler, hose shank) and E (male adapter, hose shank) are the hose ends; D (female coupler, female NPT) screws onto a male-threaded pipe or tank outlet; F (male adapter, male NPT) screws into a female port. The classic layouts: pump outlet → A, hose → C; tank outlet → D, hose → E. If in doubt, the camlock coupling types guide walks through every letter.
-
Choose the material by media and environment. Aluminum is the general-duty default — light, cheap, fine for water, dry goods and most non-corrosive service. Stainless 304/316 handles corrosive chemicals, washdown, food and marine environments. Brass suits water and moderate corrosion duty. Polypropylene is the chemical-transfer choice where metal is unsuitable. Keep both halves in the same material family to avoid galvanic corrosion — and remember the gasket must suit the media too.
-
Check pressure and temperature. Working pressure depends on size and material: per the site’s rating chart, aluminum runs 200 psi at 1/2”–2” down to 60 psi at 6”, stainless 250 psi down to 70 psi, brass 250 psi down to 120 psi, polypropylene 150 psi down to 100 psi — with derating at temperature (polypropylene roughly halves by +60°C). Confirm your service pressure and temperature against the rating table before installing; never exceed the working pressure, even briefly.
-
Confirm the thread standard. NPT for North American pipe, BSPT for UK/Europe/Asia pipe, parallel threads (NPSM/BSPP) where the equipment uses face-seal fittings. Match the pipe side exactly and confirm with the supplier before ordering — the two taper standards are not interchangeable.
Safety Warnings
Camlocks are workhorse fittings, and like all workhorse fittings they have hard limits. Respect these and the coupling is boringly reliable; ignore them and it stops being boring:
- Never use camlocks for compressed air, gas or steam. Cam and groove couplings are not rated for gas service. A camlock on a compressed-air line that releases is a projectile hazard, and steam will destroy the gasket and scald everything nearby. Use a coupling designed for those services.
- Depressurize before connecting or disconnecting. Disconnecting under pressure risks hose whip, blow-off and a face full of line contents. Close the valve, bleed the line, then touch the arms.
- Control static on flammable-liquid transfer. When pumping fuel or solvents, bond and ground the system: use conductive hose, connect a bonding wire across the transfer assembly, and confirm continuity before flow starts. Metal camlocks make metal-to-metal contact at the coupling, but the hose in the run may not be conductive — the whole path must be bonded, not just the coupling.
- Stay within the working pressure rating. The ratings assume a new, correctly seated gasket at ambient temperature. Surge spikes count — designers typically allow a 3:1 margin against spikes and never run at the rating edge.
- Keep hands and fingers clear of the arm travel path when closing. The arms snap past center quickly and pinch.
- Inspect before every connection. Cracked body, bent arm, dented groove, wrong gasket — any one of them is a reason not to connect. When in doubt, replace the part.
- Use safety locking clips where the service is critical. Clips that lock both arms closed prevent accidental release from vibration or a snagged hose — cheap insurance on pumps and truck rigs.
Troubleshooting Table
| Symptom | Likely cause | Fix |
|---|---|---|
| Leak at the gasket line | Gasket missing, wrong compound, or damaged; grit in the groove; halves not fully seated | Clean the groove, seat a correct-compound gasket flat, reseat and close both arms flush |
| Leak at the threaded end | Tape wrapped the wrong way or too few wraps; NPT/BSPT mismatch; overtightened or cross-threaded | Re-seal with tape wrapped clockwise, 3–5 wraps; confirm the thread standard; inspect for a cracked casting |
| Adapter hard to insert | Gasket displaced into the bore; debris in the coupler; dented groove or damaged adapter | Seat the gasket flat in its groove, clean both halves, deburr or replace the damaged part |
| Cam arms will not close fully | Halves not fully seated; wrong size; bent arm; debris under the arm pivot | Reseat square-on, verify both halves are the same nominal size, clean the pivots, replace bent arms |
| Arms close but will not latch | Worn cam lobes or worn arm latch surfaces | Replace the coupling — worn cams do not recover |
| Connection vibrates loose or releases | Half-closed arms; wrong size; surge pressure; snagged hose | Close both arms fully to the flush click, verify size, stay within rating, add safety locking clips |
| Coupling seized, will not open | Galvanic corrosion from mixed materials; dried media; no lubrication | Soak with penetrant, clean, lubricate pivots; if corroded, replace — and match materials next time |
| Gasket keeps blowing out | Wrong compound for the media; over-pressure; damaged groove | Fit the correct compound, confirm the pressure rating, replace a damaged body |
Frequently Asked Questions
Do I need special tools to install a camlock? No. The cam end is tool-free by design — tools appear only on the non-cam end: a screwdriver or wrench for the hose clamp, and a wrench for threaded adapters.
What size camlock fits a 2” hose? A 2” coupling. Camlocks are sized by nominal bore, so measure the inside diameter of the hose, not the outside. A 2” hose takes a 2” coupling even though the hose OD is larger.
Will camlock halves from different manufacturers mate? Yes, if they are the same nominal size and standard profile. Cam and groove couplings follow a shared dimensional standard (A-A-59326D / MIL-C-27487), so a 2” adapter of any make fits a 2” coupler of any make. Keep both halves in the same material family to avoid galvanic corrosion.
How tight should the cam arms be? Both arms must close fully — flush against the body, past the click. A half-closed arm holds at low pressure and blows off under surge.
Can I use PTFE tape on the cam end? No. Tape and sealant belong on the threaded back only. Never put sealant on the cam interface or the gasket face — it breaks the seal.
How much torque on the hose clamp? Snug, over the barbed zone — enough that the band squeezes the hose into the barbs, then verify with a firm tug-test. Crushing the hose does not seal better.
How often should camlock gaskets be replaced? At the first sign of cracking, flattening or hardening, and on a 6–12 month schedule for regular duty. Replace sooner after heavy chemical exposure. Gaskets are consumables — stock spares.
Can camlocks be used for compressed air or steam? No. Cam and groove couplings are not rated for gas or steam service. Use a coupling designed for those services.
Install It Right the First Time
The difference between a camlock that lasts years and one that leaks within a week is almost always in the installation — correct size, correct type, correct gasket, clamp over the barbs, both arms flush. If you are not sure which coupling your line needs, tell us the application and we will confirm the exact type, material, size and thread standard before you order.
Send your inquiry with: media · hose or pipe size · connection ends · pressure · temperature · quantity — we reply within 24 hours.